This guide teaches you how to add Font Awesome icons to your WordPress website in posts/pages, the sidebar or the footer. Alternatively, you can learn how to add any Font Awesome icon anywhere on your WordPress website.
Step 1 – Downloading Font Awesome :
Download the Font Awesome folder directly from the source below :
Download Font Awesome from the official website
Unzip the file and you should see a folder named “font-awesome-4.6.3”. Rename it to “font-awesome”.
Step 2 – Uploading Font Awesome to Website :
Upload the whole folder to the root of your website.
Make sure you are not uploading two “font-awesome” folders. For example, the “font-awesome-4.6.3” folder created when unzipping depending on how you did it and the real “font-awesome-4.6.3” folder inside of it.
Step 3 – Editing File To Make Font Awesome Work :
Next you have to edit the header.php file of your WordPress install.
This can be done by either :
Add the following somewhere at the top, between the HEAD tags of the template :
<link rel="stylesheet" href="http://domain.com/font-awesome/css/font-awesome.min.css">Of course, replace “domain.com” with the domain name of your website and include WWW if necessary.
Step 4 – Making Font Awesome Icons Appear on Website :
Once all of the above is out of the way, the last thing to do is apply Font Awesome to your web pages.
This can be done through two methods (scroll down to view each) :
Using CSS class in HTML code :
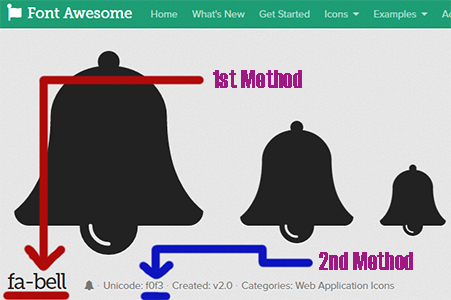
Find the icon the want to use at Font Awesome’s Icon Database and select it. On the page, find the area highlighted with the red underline in the screenshot above.
Add it after the “fa” text in the class attribute as seen in the examples below to display the Font Awesome icon :
<i class="fa fa-bell""></i> Hello
<i class="fa fa-bomb"></i> everyone
<i class="fa fa-anchor"></i> my name
<i class="fa fa-cogs"></i> is Marc
Result :
![]()
As you can see in the first line of the HTML, “fa-bell” is placed after “fa” followed by a space in the middle.
Using CSS to display Font Awesome icons site-wide in WordPress :
In WordPress, edit your CSS file: Appearance -> Editor -> style.css (alternatively, it can be modified via FTP).
Add the following to the CSS template to display the Font Awesome icon in the post/page content’s lists :
.entry-content ul li:before {
font-family: fontawesome;
content: "\f0f3";
padding-right: 5px;
}
Add the following to the CSS template to display the Font Awesome icon in the sidebar or footer’s lists :
.widget ul li:before {
font-family: fontawesome;
content: "\f0f3";
padding-right: 5px;
}
Replace "f0f3" in the code above with the text highlighted in blue from the screenshot above to change the Font Awesome icon you want to display.
Take note that the CSS above may need adjusting if you have a custom theme installed.